Hello there,
I'm sorry that I have not blogged for such a long time, with lockdown happening back in March, I think my brain went into lockdown too, so no crafting got done unfortunately, but I am starting to get my crafty mojo back slowly, and making cards for my relatives Birthdays.
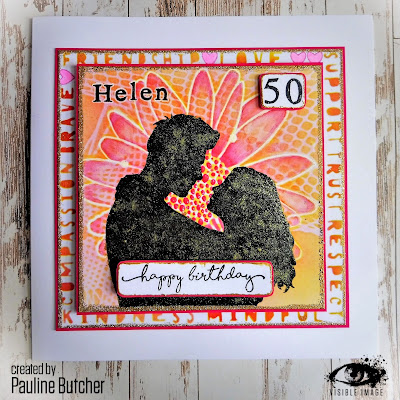
This card was for Helen ( aka Mrs Awesome Alexander of 'Visible Image' ) it was her special 50th Birthday back in June, so I had to make it good !!!!!
I created this card, using a selection of the awesome Stencils that Mark has designed for Visible Image, along with a couple of their stamp sets.
The Fabulous Brand New stencils I used were ........
I also used an older stencil.........
And the stamp sets I used were .......
I started with a 6" x 6" piece of white smooth 300gsm card, and placed the Fishnet stencil on to it, and blended Mustard Seed Distress ink through it, I took that one away, and added Daisy Daisy onto the card, and blended through with Pickled Raspberry Distress ink through it. I put this layer of card aside to dry.
I cut another piece of card 7" x 7", and using the 'Words of Support' stencil, I picked out the words I wanted to use, masking off the others, and blended through with Mustard Seed Distress Ink, then Ripe Persimmon on the top, I also added a few hearts where there were big enough gaps, between the words.
Going back to the first layer I did, taking the 'Always and Forever' stencil, laid it on top of the stenciled card, and using Black Soot Distress Ink, I blended through, making sure that it was nice and black by pouncing my blending tool. Whilst this was drying, I used an embossing pen and ran it around all the edges, then put some Wow Metallic Gold Sparkle embossing glitter over the embossing liquid that the pen had left, then heated it with my heat tool, giving all the edges a lovely gold sparkle, I did the same technique around the edges of the layer with the words around it.
I matted both of the layers onto pink card.
The next job was to use the Alphabetical stamp set, to add Helen's name to the top layer of the card, I stamped using Versafine Onyx Black ink, I then used my white pen all aroung each letter, to highlight it. I stamped the 50 onto a piece of white card, and also the Happy Birthday from the 'Go to Words'. I cut out both of these, and then again with my embossing pen, went around all the edges, and using the Gold Sparkle embossing powder, heated it to give a nice sparkly edge. I also matted both of these onto pink card. With a slim patette knife, and some Cosmic Shimmer Gold Luna paste, I very gently added a very small amount ontop of the stenciled couple, just to give a bit of shimmer. I also added some Stardust Stickles to the middle of the Daisy Daisy, and with some Picked Raspberry and a damp paint brush, I also added a bit of shading to the Daisy.
The last thing to do, adhere the layers together onto an 8" x 8" card blank, and add the 50 and the Happy Birthday, using some 3D Glue gel.
I hope to get some more crafting done, but we've started decorating the house, hopefully I will get away with just directing, and choosing colours, hehehehe !!!!
Here are all the Visible Image places of interest, for you to check out......
The SHOP, where you can find all the Visible Image Stamp collections.
The BLOG, catch up with all the Visible Image news.
The FACEBOOK GROUP, where you can enter the 'Show and Tell'.
The FACEBOOK PAGE, where there are exiting weekly giveaways.
and the three social media sites......
Thank you for visiting, stay safe and stay well, hugs, Pauline xxxxxxx


