Followers

Friday 24 July 2020

Visible Image Stamps and Stencils, Distress Inks, Luna paste, Wow Gold Embossing Powder.


Hello there,
I'm sorry that I have not blogged for such a long time, with lockdown happening back in March, I think my brain went into lockdown too, so no crafting got done unfortunately, but I am starting to get my crafty mojo back slowly, and making cards for my relatives Birthdays.
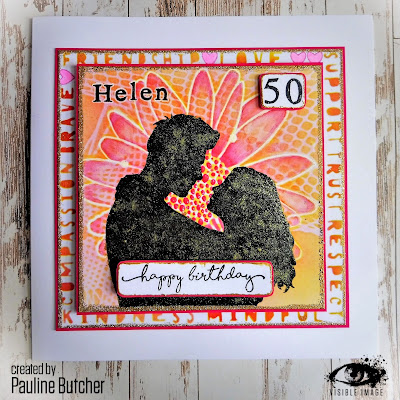
This card was for Helen ( aka Mrs Awesome Alexander of 'Visible Image' ) it was her special 50th Birthday back in June, so I had to make it good !!!!!
I created this card, using a selection of the awesome Stencils that Mark has designed for Visible Image, along with a couple of their stamp sets.


The Fabulous Brand New stencils I used were ........
I also used an older stencil.........
And the stamp sets I used were .......

I started with a 6" x 6" piece of white smooth 300gsm card, and placed the Fishnet stencil on to it, and blended Mustard Seed Distress ink through it, I took that one away, and added Daisy Daisy onto the card, and blended through with Pickled Raspberry Distress ink through it. I put this layer of card aside to dry.
I cut another piece of card 7" x 7", and using the 'Words of Support' stencil,  I picked out the words I wanted to use, masking off the others, and blended through with Mustard Seed Distress Ink, then Ripe Persimmon on the top, I also added a few hearts where there were big enough gaps, between the words.
Going back to the first layer I did, taking the 'Always and Forever' stencil, laid it on top of the stenciled card, and using Black Soot Distress Ink, I blended through, making sure that it was nice and black by pouncing my blending tool. Whilst this was drying, I used an embossing pen and ran it around all the edges, then put some Wow Metallic Gold Sparkle embossing glitter over the embossing liquid that the pen had left, then heated it with my heat tool, giving all the edges a lovely gold sparkle, I did the same technique around the edges of the layer with the words around it.
I matted both of the layers onto pink card.


The next job was to use the Alphabetical stamp set, to add Helen's name to the top layer of the card, I stamped using Versafine Onyx Black ink, I then used my white pen all aroung each letter, to highlight it. I stamped the 50 onto a piece of white card, and also the Happy Birthday from the 'Go to Words'. I cut out both of these, and then again with my embossing pen, went around all the edges, and using the Gold Sparkle embossing powder, heated it to give a nice sparkly edge. I also matted both of these onto pink card. With a slim patette knife, and some Cosmic Shimmer Gold Luna paste, I very gently added a very small amount ontop of the stenciled couple, just to give a bit of shimmer. I also added some Stardust Stickles to the middle of the Daisy Daisy, and with some Picked Raspberry and a damp paint brush, I also added a bit of shading to the Daisy.


 The last thing to do, adhere the layers together onto an 8" x 8" card blank, and add the 50 and the Happy Birthday, using some 3D Glue gel.
I hope to get some more crafting done, but we've started decorating the house, hopefully I will get away with just directing, and choosing colours, hehehehe !!!!

Here are all the Visible Image places of interest, for you to check out......

The SHOP, where you can find all the Visible Image Stamp collections.

The BLOG, catch up with all the Visible Image news.

The FACEBOOK GROUP, where you can enter the 'Show and Tell'.

The FACEBOOK PAGE, where there are exiting weekly giveaways.

and the three social media sites......


Thank you for visiting, stay safe and stay well, hugs, Pauline xxxxxxx
Friday 17 April 2020

Visible Image Stamps and Stencils, Distress Inks, Versafine Onyx Black Ink & Stickles.


Hi there,

I hope you are all staying well and safe, it's Fabulous Fortnightly Friday, and I've created a card as a tribute to all the Nurses on the front line, doing an absolutely fantastic job, along with all the Doctors, and of course all the other key workers, who are working hard to keep us safe and fed, in this unprecedented time. There is a Rainbow challenge in the Visible Image Group, it would be great if you would all enter, not only to show all the NHS and key workers that we care, but to brighten up this uncertain world.


The Visible Image products I used on this card are........
Face It stamp setSquare Root Stencil, Angel word from Guardian Angel, and the sentiment from Believe in Me, stamp set.

I used a piece of mixed media card stock and cut it to 6" x 8", placed the stencil on it, and with my blending brushes, and Distress inks, I made diagonal stripes of colour, filling the card, I took away the stencil, then cut off 2" from the 8" side ( for sentiments) I stamped the face in the middle of the card, using Versafine Onyx Black ink, and a stamp platform, so's I could make the image nice and dark, by stamping 3 or 4 times. I used bleach to lighten the whites of the eyes, and pens for her eye shadow, I used pink Stickles for her lips, and also over her eye shadow, when the Stickles was dry, I then went over the lips again with some Glossy Accents, I also added it to the eyes.


I worked on the sentiments next, using the 2" of card I cut off the side, I stamped all three sentiments using Versafine Onyx Black, trying to get the stripes of colour to go in the opposite direction, so they stand out more, I also distressed the edges with Salty Ocean Distress ink, and adhered them onto the card with 3D Glue gel.
Now that the topper is finished, I put it onto Black card, then onto a 7" square white card blank. I used a White pigment pen to highlight the eyes, and all the sentiments.


Here are all the Visible Image places of interest, for you to check out......

The SHOP, where you can find all the Visible Image Stamp collections, and the Black Friday Sale.

The BLOG, catch up with all the Visible Image news.

The FACEBOOK GROUP, where you can enter the 'Show and Tell'.

The FACEBOOK PAGE, where there are exiting weekly giveaways.

and the three social media sites......


Thank you for visiting, stay safe and stay well, hugs, Pauline xxxxxxx

Friday 3 April 2020

Visible Image Stamps and Stencils, Distress Inks, Creative Expressions Gold Texture Paste, Quickie Glue Pen, Gold Gilding Flakes, & Gold Pen.


Hi there,

It's Fabulous Fortnightly Friday, albeit a little late, my time scale at the moment, has flown out of the window, my day's seem to start at midday, lol !!!!!
I hope you are all staying home and staying safe, and finding that you have loads of Crafting time. 
Helen and Mark of 'Visible Image' are still working hard from home, so you can order Stamps and Stencils, safe in the knowledge that their products will get to you as quickly as Royal Mail can deliver them.

So my share today is a card I've created using some awesome 'Visible Image' Stamps and one of their fabulous stencils.


The stamps I've used on this 7" x 7" card are ...........
Universal Background stamps, one of my favourites, and another fave is Ink Splats, one of the superb sentiments off the Look Forward with Hope set, the small Sun stamp is from this set too, and lastly the super Drizzle Stencil.

I started off with a piece of Centura Pearl 300gsm Card, but I used the mat side of the card, and NOT the pearl side. I cut it to 5 1/2" x 5 1/2", and with the Universal Stamp set, and Mustard Seed, Picked Raspberry, and Wilted Violet Distress Inks, I stamped randomly, using 3 or 4 of the circular stamps. Then using Salty Ocean Distress Ink, I blended over the background, I used my blending tools, but you can use blending brushes,make up brushes, cut n' dry foam, anything you feel happy with. Around the edges I blended Blueprint Sketch Distress ink, I also used Blueprint Sketch with the Ink Splats, and again stamped randomly over the background. Using the Gold Texture paste, along with a palette knife, I smoothed a small amount onto my glass mat,and using one of the round stamps from Universal, mounted on an acrylic block, I stamped a few times into the paste on my mat, checking that the stamp was covered, then stamped it randomly onto the background, repeating until it looks even. I dried this background with my heat tool, before adding the Stencil to the top, if you are confident holding it in place, but I like to use some stencil tape to hold it in place, then with a palette knife, gently smooth the paste across the stencil, it's best to just smooth one way, or you could get paste under the stencil, put this aside to dry naturally.


To make the sentiment topper, I blended Blueprint Sketch Distress Ink onto a piece of white card, you could of course use some ready coloured Blue card, I stamped the chosen sentiment onto the blue card, using Versafine Black Ink, which I added white penwork to, I also stamped the Sun in the corner again with Versafine Black Ink, I went over the image on the card, with a Quickie Glue Pen, then added some Gold Gilding flakes. I also made a faux sewing line, around the edges, with a Gold Pen, but I rounded the corners before I did it.

I made mats and layers, the blue one was using the Blueprint Sketch Distress Ink, and for the gold layer, I added some water to the texture paste which was on my glass mat, and painted the edges of some white card.

Here are all the Visible Image places of interest, for you to check out......

The SHOP, where you can find all the Visible Image Stamp collections, and the Black Friday Sale.

The BLOG, catch up with all the Visible Image news.

The FACEBOOK GROUP, where you can enter the 'Show and Tell'.

The FACEBOOK PAGE, where there are exiting weekly giveaways.

and the three social media sites......


Thank you for visiting, please leave me a comment, stay safe, hugs Pauline xxxxxxx

Friday 20 March 2020

Visible Image Stamps and Stencils,Bockingford, Brusho, IndigoBlu Slap it On, Distress Oxides and Stickles.


Hi there my lovlies,

I hope you are all keeping well and safe, in this terrible pandemic. I am self isolating as much as I can, but I also look after my elderly Mum, who's 99, so some days are very difficult. Anyway, I just wanted to share a card I've made, using some awesome 'Visible Image' stamps and stencils, and to tell you that 'Visible Image' are trading as usual at the moment, so you can place your on-line orders with confidence, get some new goodies to play with, whilst you are at home.


I used a new stencil for this card, called.......Scribble, along with a sentiment from ........ Brave and Strong, which contains 5 fabulous sentiments.

I used some Bockingford hot pressed 300gsm watercolour paper, cut to just under A5 size. I placed the stencil on top of the Bockingford, and anchored it with some stencil tape, then using a palette knife, I smoothed the IndigoBlu Extra Thick Slap-it-On, through the stencil, and removed it straight away, you can either wash it, or put it to soak in water. I left the card to dry over night.

When the paste was totally dry, I spritzed it with water, then sprinkled Brusho onto the water, adding more water to make the colours move, as you can see from the photo, the colour settled into the design of the stencil ( you can take colour off the dry paste, with damp kitchen towel. Again I put this aside to dry,

On another piece of Bockingford, I stamped the sentiment, using Versafine black Ink, then shaped the card, and blended Oxide inks around the edges, I chose colours that would match the Brusho's I'd used. I also used Oxide ink, blended around the edges of the main background. 


I adhered the background onto a blue card layer, then adhered it onto a white A5 card blank, I also put the sentiment onto a blue layer, then adhered it to the front of the card, with Pinflair 3D Glue Gel, to give it some dimension.
Lastly I added some Stardust Stickles to the paste on the background, to give it a bit of bling.

Here are all the Visible Image places of interest, for you to check out......

The SHOP, where you can find all the Visible Image Stamp collections, and the Black Friday Sale.

The BLOG, catch up with all the Visible Image news.

The FACEBOOK GROUP, where you can enter the 'Show and Tell'.

The FACEBOOK PAGE, where there are exiting weekly giveaways.

and the three social media sites......


Thank you for visiting, please leave me a comment, stay safe, hugs Pauline xxxxxxx

Friday 6 March 2020

Visible Image Stamps and Stencils, Brusho, IndigoBlu Super Thick Slap it On, Bockingford Paper, Wow Embossing Powders, Distress Inks, Heat Resistant Acetate, Stardust Stickles &


Hello there,

I do hope you are all safe, and not suffering with floods and viruses, gosh we do need some better weather, to brighten all our spirits !!!
I'm here to share another card I've made using some of the awesome stamps and stencils available from 'Visible Image', have you checked out their new stamps and stencils ?, click on the link to take a look.


I used the new Revolution stamp set, it's a fabulous set, so many usable stamps, I love it. I didn't use all the stamps either, so I'm still playing. I also used the super new Renaissance stencil.

I started with the background on a piece of A5 Bockingford 300gsm Hot pressed watercolour paper, on which I spritzed water, then sprinkled Brusho on top, adding more water to fill the card with colour. I put this aside to dry naturally, as force drying it with a heat tool, would have taken bleached the colour. I then blended some more colour onto the card, in the form of Distress inks, the colours I used were....... Picked Raspberry, Mustard Seed, and Wilted Violet.

When the background was totally dry, I put the stencil on the top, but to one side, taped it down with low tack tape, and with a palette knife, smoothed the Slap it On through. I gently took off the tape, and lifted the stencil off. I put the stencil straight into water, so's the paste wouldn't go hard on it.
While the paste was wet on the card, I sprinkled 'Wow' embossing powder ( Twinkling Lights WS73R, and Neptune WS177R ), and then heated it with my heat tool, until the powder bubbled. I also used some double sided red line tape down the other side of the edge, took off the red bit, and also added the same Embossing powders randomly onto the sticky tape, and heated. I put this background aside to totally dry.


 Taking a sheet of  A4 Heat resistant Acetate, I stamped onto it, 3 of the horse stamp, using a Wow Embossing pad, and then heat embossed with 'Wow' Primary Ebony  Embossing Powder, I fussy cut these out, because they are on acetate, you don't have to be particularly close, as the edges disappear once on the project. The 'Wow' Embossing Pad, is very good, because it's a sticky formula, it doesn't slip so easily on the acetate....... do try it.


I repeated the process with the sentiment stamps and the Three Musketeers, sometimes you may get a missed bit when you heat emboss, just let it dry, and use a black paint on the reverse of the acetate, to cover the missed bits.

Going back to the background, I used the scroll stamp, and some Distress ink in Peacock Feathers, and randomly stamped in the bit of card between the embossing parts.

I put the card together, using Pinflair Glue Gel, on all the acetate pieces, to raise them up to add dimension. I decided it needed something else, so again using the acetate, I stamped some Fleur de lys and heat embossed them with 'Wow' Earthtone Pepper WJ04R, and attached them with Glue gel too. I added some Stickles to the Fleur de Lys, for another bit of bling.

Here are all the Visible Image places of interest, for you to check out......

The SHOP, where you can find all the Visible Image Stamp collections, and the Black Friday Sale.

The BLOG, catch up with all the Visible Image news.

The FACEBOOK GROUP, where you can enter the 'Show and Tell'.

The FACEBOOK PAGE, where there are exiting weekly giveaways.

and the three social media sites......


Thank you for visiting, please leave me a comment, hugs Pauline xxxxxxx

Friday 21 February 2020

Visible Image Stamps and Stencils, Distress Inks, Zig Clean Color Brush Pens, Glossy Accents & Stickles.


Helloooo,

It's Fabulous Fortnightly Friday, and I do hope the heavy rain of late has not effected you too badly, it's been a hell of a couple of weeks weather wise, and if it has, my deepest sympathy comes to you and your families.

 Time for me to share something I've created using the awesome Visible Image products, and this time it's a 6" x 6" card.
So, I have mixed some of the new products with some of the older ones, just to show you that all the fabulous Visible Image products, mix and match together so well.


The Visible Image products I used on this card were.......
Face ItInk Splats, the new Free your Imagination stamp set, and the new Breaking Glass stencil, all pictured below.


I started off with a piece of white card 5" x 5", and I stamped the closed eyes from the Face It stamp set, using a Wow Embossing pad, and heat embossed with Wow Primary Ebony Embossing powder. I then blended Mustard Seed Distress Ink, with a blending tool, around the outside of the card, and around the middle, leaving the white card showing around the eyes, I added a little Ripe Persimmon in places too.

 I then stamped a few of the ink splats in different Distress colours, I also stamped with the small ink splat from the 'Free Your Imagination' set. Now for the stencil, as you can see from the photo's I used Spiced Marmalade Distress Ink, gently blended through the Breaking Glass stencil........


......... to just give an extra dimension to the card, looks good doesn't it, I do love all the Visible Image stencils.

On a piece of old music paper, I stamped the book from the 'Free Your Imagination' set, using Versafine Onyx Black ink, and fussy cut it, then blended over it with some Tea Dye Distress Ink, to age it a little more. 
On some white card, I stamped the feather Quill and the ink pot, again from the 'Free Your Imagination' set, with the Onyx Versafine, then coloured them with Clean Color Brush Pens, and fussy cut these too.


I adhered the fussy cut elements, to the card using 3D Glue Gel, and added some stickles to the Quill, and the eyes, for that extra bit of sparkle.

Here are all the Visible Image places of interest, for you to check out......

The SHOP, where you can find all the Visible Image Stamp collections, and the Black Friday Sale.

The BLOG, catch up with all the Visible Image news.

The FACEBOOK GROUP, where you can enter the 'Show and Tell'.

The FACEBOOK PAGE, where there are exiting weekly giveaways.

and the three social media sites......


Thank you for visiting, please leave me a comment, hugs Pauline xxxxxxx

Friday 7 February 2020

Visible Image Stamps, Brea Reese Liquid Watercolour Inks, Oxide Ink, Zig Real Brush Watercolor pens, Wow Embossing Glitter, Stickles, & Sukura Stardust Pen.


Hi There,

It's Fabulous Fortnightly Friday, so my day to share a project I've made using a Brand New 'Visible Image' stamp set, called Break Free.


This card is  8" x 8", so I cut a piece of Bockingford Hot Pressed Watercolour 300gsm paper 7" x 7" for my background, I spritzed it with water, then randomly added some drops of 'Brea Reese' liquid watercolour inks, in yellow, Magenta, Ultramarine and Ocean Green, I then spritzed with water again, and let the colours drip, wick and merge together. I left this to dry naturally.

Whilst the background was drying, I took another piece of Bockingford, and stamped three daisies, using Versafine Onyx Black Ink, then dried them with my Heat Tool, I then coloured them in, using Zig Clean Color watercolour Brush Pens, but I could have used a paint brush and the liquid inks instead. 
I then fussy cut the daisies and added some Stardust Stickles to their centres.


I also stamped the smashed Vase using a Versacraft pad, onto Bockingford, put  on 'Wow' Nice Ice Blue Embossing Glitter, thn heat embossed with my heat tool. I also stamped the sentiment with Versafine Onyx Black ink, again onto Bockingford.

Now the background is dry, using the smashed Vase stamp in my hand (not on a stamping block), and using Picked Raspberry Oxide Ink, I stamped all over the background, making sure that the stamping was all going the same way. I dried the background with my heat tool,  I then went over the background with an anti-static bag, and again using the smashed Vase stamp, but this time on a block, and I stamped in the middle of the background, using Versamark, and again heat embossed with the 'Wow' Nice Ice Blue embossing glitter.
The background was then adhered to a black card mat, and then onto a yellow card mat, and adhered to the 8" white card blank.


I stamped three stems onto the background, using a green Oxide Ink, ready for the daisies to sit on, and using the smashed Vase image, that was heat embossed onto the Bockingford, I fussy cut the vase, and some of the smashed pieces, and adhered them to the main image, using 3D Glue Gel, to give dimension. I also added the daisies, and cut the sentiment into an arrow shape, and added that to the card with 3D glue gel.
To finish off, I added some random Stickles around the smashed bits, used a Sukura sparkle pen randomly over the inky background, then used Glossy Accents on all the vase pieces.


Here are all the Visible Image places of interest, for you to check out......

The SHOP, where you can find all the Visible Image Stamp collections, and the Black Friday Sale.

The BLOG, catch up with all the Visible Image news.

The FACEBOOK GROUP, where you can enter the 'Show and Tell'.

The FACEBOOK PAGE, where there are exiting weekly giveaways.

and the three social media sites......


Thank you for visiting, please leave me a comment, hugs Pauline xxxxxxx